Hello, from Ashley Zhong! Reigning queen of Snapdragon Brand and famed Granny Square Obsessive. I'm here today, not because the world needs another pattern for the classic granny square, but because I'd like to share my personal way of making them. I've taken years to experiment, study others and obsess, working to make what I consider the easiest, most attractive, squarest granny square and I'm ready to show the world!
Join me! My way is obviously just one iteration of the classic pattern (I remind myself and others all the time that there are NO rules to crochet), but I think if you give it a try, you might like some of my time-saving methods and proven techniques. Share your thoughts in the comments, or give me some tips to make this tutorial even better!
*Note, this tutorial is best enjoyed if you have some understanding of a basic granny square. If you're a beginner, my instructions may seem a little convoluted. Sorry in advance :p

Supplies:
- A few colors of yarn, medium weight
- An 'I-9' or 5.5 mm Crochet Hook (this is negotiable, it's about how smushy you want it)
- Scissors
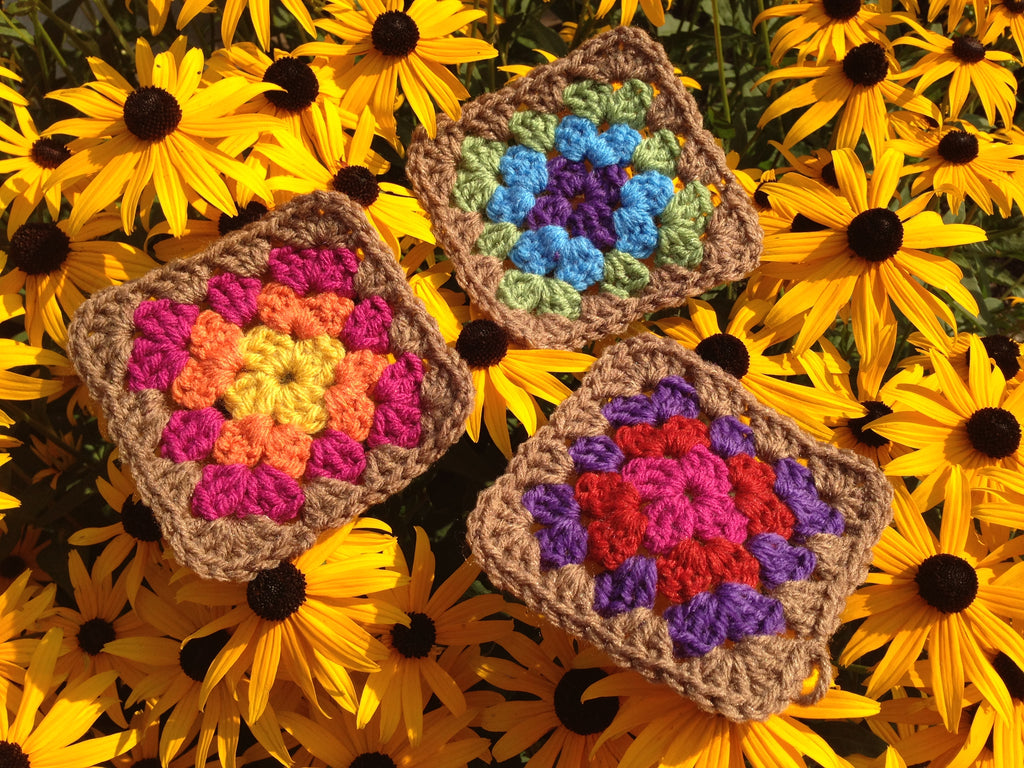
Round 1: think SQUARE


Using the color you want the center of your square to be, make a slip knot and chain 4. Use a slip stitch to connect to the end of your chain, forming a loop. It's okay if it doesn't look like a loop (yay! I made a blob!). Chain 2: this counts as your first double crochet. DC 2 into the 'hole' of your loop and chain 1. You have now made your first cluster and are ready to make your next!

To complete your first round, DC 3 into the hole and chain 1 three more times. You should now have 4 clusters with a chain between each, making the corners of the 'square'. Slip stitch into your first cluster to seal the row, cut your yarn and pull it through your loop to tie-off.
Round 2: Saving time!

Make a slip knot with the color you want to use for your 2nd row. Now, I'm about to throw some tricks at you, so be ready!


With your new color, wrap your hook like you would normally do for a DC and make a DC right into one of the little openings between your row 1 clusters. Most patterns would have you slip stitch and chain 2, but I prefer the look of a regular DC.
DC 2 more to make a cluster, chain 1 and make another DC cluster in the same opening (there should now be 6 DCs in the opening, divided by 1 chain).

Next, WITHOUT chaining again, move to the next opening and repeat 3DC, 1Ch, 3DC. Do not chain between corners. This is different from most patterns that would have to put a chain between each cluster. I only chain 1 between the corner clusters to make them nice and square (and nowhere else! This way your square should lay flat no matter how big you make it).
When putting your clusters in the opening that you tied off on the previous row, be careful to crochet OVER the yarn tail, tucking it in against the chain and anchoring/hiding it under your current row. If you did it right, you should have crocheted right on top of it, essentially 'weaving it in' automatically. This shocks people sometimes, but I have found it to be a MAJOR time saver and approve of this method 100%. Slip stitch into your first cluster (of row 2) to seal the row, cut your yarn and pull it through your loop to tie-off.
Row 3: Rinse and repeat

With the color you want to use for the 3rd row, make a slip knot, and DC directly into one of the interior/side openings of row 2. Do not start on a corner, they receive more physical stress and are more likely to come undone down the road.
Complete your cluster and work your way around the square, using 3DC, 1Ch, 3DC for corners and a single cluster in the side openings (no chains in-between). Be sure to crochet over the tails from row 2, tucking them in so you don't have to do it later (I started row 3 with the tails in the picture, but you can tuck them when you get to them, no matter where you start). Slip stitch into the first DC of row 3, cut your yarn and pull it through your loop to tie-off.

Well, once you know how to do row 3, you can repeat the steps forever and watch your square grow, grow, grow. You can even make an afghan out of 1 single giant granny square. The world is your oyster, so get to slurpin'!

Trim your ends with confidence. Each row is knotted onto itself and will not unravel. I frequently wear garments made of granny squares and I have never had anything come apart as long as I crochet over my ends. It's weirdly controversial in the crochet world, but I say there's no such thing as 'cheating' when it comes to making things. If you find a shortcut that doesn't negatively affect your finished product? Go for it! I didn't mention it at the beginning of the tutorial (didn't want to confuse people), but I even tucked in the end when I made the initial loop for row 1.

Things to consider and troubleshooting:
- To flip, or not to flip? Some patterns tell you to flip your work every row. I flip if I feel like it, I don't flip if I don't feel like it. It doesn't matter. I just try to be consistent within a project.
- Is your square slowly twisting from the center? Take time between each row to tug it into an even square. If that doesn't work, flipping your square every row might help.
- Do I need to block? I find that my method doesn't really require blocking. If your squares are not geometric enough for your liking though, just block. No one is judging.
- Is the side where you connect your finished rows getting longer/wider than the other sides of your square? Vary where you connect so that your shaped doesn't distort. I always find the side I connect on is just a little longer, so changing every row keeps the shape even.
- Will my granny square come unraveled? It shouldn't. Just stitch tightly over the tails to make sure they are secure and won't poke out. That way, they're basically double knotted.

https://saudi-germany.com/ شركة السعودي الالماني للخدمات المنزلية
https://saudi-germany.com/%d8%b4%d8%b1%d9%83%d8%a7%d8%aa-%d8%aa%d9%86%d8%b8%d9%8a%d9%81-%d8%ae%d8%b2%d8%a7%d9%86%d8%a7%d8%aa-%d8%a8%d8%ac%d8%af%d8%a9/ شركات تنظيف خزانات بجدة
https://saudi-germany.com/%d8%aa%d9%86%d8%b8%d9%8a%d9%81-%d8%ae%d8%b2%d8%a7%d9%86%d8%a7%d8%aa-%d8%a8%d8%ac%d8%af%d8%a9/ تنظيف خزانات بجدة
https://saudi-germany.com/%d8%a7%d9%81%d8%b6%d9%84-%d8%b4%d8%b1%d9%83%d8%a9-%d8%aa%d9%86%d8%b8%d9%8a%d9%81-%d8%ae%d8%b2%d8%a7%d9%86%d8%a7%d8%aa-%d8%a8%d8%ac%d8%af%d8%a9/ افضل شركة تنظيف خزانات بجدة
https://saudi-germany.com/%d8%a7%d8%b1%d8%ae%d8%b5-%d8%b4%d8%b1%d9%83%d8%a9-%d8%aa%d9%86%d8%b8%d9%8a%d9%81-%d8%ae%d8%b2%d8%a7%d9%86%d8%a7%d8%aa-%d8%a8%d8%ac%d8%af%d8%a9/ ارخص شركة تنظيف خزانات بجدة
https://saudi-germany.com/%d8%ba%d8%b3%d9%8a%d9%84-%d8%ae%d8%b2%d8%a7%d9%86%d8%a7%d8%aa-%d8%a8%d8%ac%d8%af%d8%a9/ غسيل خزانات بجدة
https://saudi-germany.com/%d8%b4%d8%b1%d9%83%d8%a9-%d8%aa%d9%86%d8%b8%d9%8a%d9%81-%d8%ae%d8%b2%d8%a7%d9%86%d8%a7%d8%aa-%d8%a8%d8%ac%d8%af%d8%a9/ شركة تنظيف خزانات بجدة
https://saudi-germany.com/cleaning-tanks-company-taif/
https://saudi-germany.com/cleaning-tanks-company-mecca/
https://saudi-germany.com/jumperads-transfer-furniture/
https://saudi-germany.com/%d8%a7%d9%81%d8%b6%d9%84-20-%d8%b4%d8%b1%d9%83%d8%a9-%d9%86%d9%82%d9%84-%d8%b9%d9%81%d8%b4-%d8%a8%d9%8a%d9%86%d8%a8%d8%b9-%d8%ae%d8%b5%d9%85-50-%d9%85%d8%b9-%d8%a7%d9%84%d9%81%d9%83-%d9%88%d8%a7/
https://saudi-germany.com/%d8%a7%d8%b1%d8%ae%d8%b5-%d8%b4%d8%b1%d9%83%d8%a9-%d9%86%d9%82%d9%84-%d8%b9%d9%81%d8%b4-%d8%ac%d8%af%d8%a9-%d8%ad%d9%8a-%d8%a7%d9%84%d8%b5%d9%81%d8%a7/
https://saudi-germany.com/%d8%a7%d8%b1%d8%ae%d8%b5-%d8%b4%d8%b1%d9%83%d8%a9-%d9%86%d9%82%d9%84-%d8%b9%d9%81%d8%b4-%d8%ac%d8%af%d8%a9-%d8%a7%d8%a8%d8%ad%d8%b1-%d8%a7%d9%84%d8%b4%d9%85%d8%a7%d9%84%d9%8a%d8%a9/
https://saudi-germany.com/%d8%a7%d8%b1%d9%82%d8%a7%d9%85-%d8%b4%d8%b1%d9%83%d8%a7%d8%aa-%d9%86%d9%82%d9%84-%d8%b9%d9%81%d8%b4-%d8%a8%d8%ac%d8%af%d8%a9-%d9%85%d8%b9-%d8%a7%d9%84%d8%aa%d8%ba%d9%84%d9%8a%d9%81/
https://saudi-germany.com/%d8%a7%d8%b1%d8%ae%d8%b5-%d8%b4%d8%b1%d9%83%d8%a9-%d9%86%d9%82%d9%84-%d8%b9%d9%81%d8%b4-%d8%a8%d8%ac%d8%af%d8%a9/
https://emc-mee.com/blog.html شركات نقل العفش
اهم شركات كشف تسربات المياه بالدمام كذلك معرض اهم شركة مكافحة حشرات بالدمام والخبر والجبيل والخبر والاحساء والقطيف كذكل شركة تنظيف خزانات بجدة وتنظيف بجدة ومكافحة الحشرات بالخبر وكشف تسربات المياه بالجبيل والقطيف والخبر والدمام
https://emc-mee.com/cleaning-company-yanbu.html شركة تنظيف بينبع
https://emc-mee.com/blog.html شركة نقل عفش
اهم شركات مكافحة حشرات بالخبر كذلك معرض اهم شركة مكافحة حشرات بالدمام والخبر والجبيل والخبر والاحساء والقطيف كذلك شركة رش حشرات بالدمام ومكافحة الحشرات بالخبر
https://emc-mee.com/anti-insects-company-dammam.html شركة مكافحة حشرات بالدمام
شركة تنظيف خزانات بجدة الجوهرة من افضل شركات تنظيف الخزانات بجدة حيث ان تنظيف خزانات بجدة يحتاج الى مهارة فى كيفية غسيل وتنظيف الخزانات الكبيرة والصغيرة بجدة على ايدى متخصصين فى تنظيف الخزانات بجدة
https://emc-mee.com/tanks-cleaning-company-jeddah.html شركة تنظيف خزانات بجدة
https://emc-mee.com/water-leaks-detection-isolate-company-dammam.html شركة كشف تسربات المياه بالدمام
https://emc-mee.com/ شركة الفا لنقل عفش واثاث
https://emc-mee.com/transfer-furniture-jeddah.html شركة نقل عفش بجدة
https://emc-mee.com/transfer-furniture-almadina-almonawara.html شركة نقل عفش بالمدينة المنورة
https://emc-mee.com/movers-in-riyadh-company.html شركة نقل اثاث بالرياض
https://emc-mee.com/transfer-furniture-dammam.html شركة نقل عفش بالدمام
https://emc-mee.com/transfer-furniture-taif.html شركة نقل عفش بالطائف
https://emc-mee.com/transfer-furniture-mecca.html شركة نقل عفش بمكة
https://emc-mee.com/transfer-furniture-yanbu.html شركة نقل عفش بينبع
https://emc-mee.com/transfer-furniture-alkharj.html شركة نقل عفش بالخرج
https://emc-mee.com/transfer-furniture-buraydah.html شركة نقل عفش ببريدة
https://emc-mee.com/transfer-furniture-khamis-mushait.html شركة نقل عفش بخميس مشيط
https://emc-mee.com/transfer-furniture-qassim.html شركة نقل عفش بالقصيم
https://emc-mee.com/transfer-furniture-tabuk.html شركة نقل عفش بتبوك
https://emc-mee.com/transfer-furniture-abha.html شركة نقل عفش بابها
https://emc-mee.com/transfer-furniture-najran.html شركة نقل عفش بنجران
https://emc-mee.com/transfer-furniture-hail.html شركة نقل عفش بحائل
https://emc-mee.com/transfer-furniture-dhahran.html شركة نقل عفش بالظهران
https://emc-mee.com/transfer-furniture-kuwait.html شركة نقل عفش بالكويت
https://emc-mee.com/price-transfer-furniture-in-khamis-mushit.html اسعار شركات نقل عفش بخميس مشيط
https://emc-mee.com/numbers-company-transfer-furniture-in-khamis-mushit.html ارقام شركات نقل عفش بخميس مشيط
https://emc-mee.com/new-company-transfer-furniture-in-khamis-mushit.html شركة نقل عفش بخميس مشيط جديدة
https://emc-mee.com/transfer-furniture-from-khamis-to-riyadh.html شركة نقل عفش من خميس مشيط الي الرياض
https://emc-mee.com/transfer-furniture-from-khamis-mushait-to-mecca.html شركة نقل عفش من خميس مشيط الي مكة
https://emc-mee.com/transfer-furniture-from-khamis-mushait-to-jeddah.html شركة نقل عفش من خميس مشيط الي جدة
https://emc-mee.com/transfer-furniture-from-khamis-mushait-to-medina.html شركة نقل عفش من خميس مشيط الي المدينة المنورة
https://emc-mee.com/best-10-company-transfer-furniture-khamis-mushait.html افضل 10 شركات نقل عفش بخميس مشيط
https://emc-mee.com/%D8%B4%D8%B1%D9%83%D9%87-%D9%86%D9%82%D9%84-%D8%B9%D9%81%D8%B4-%D8%A8%D8%AC%D8%AF%D9%87.html
https://emc-mee.com/%D8%B4%D8%B1%D9%83%D8%A9-%D9%86%D9%82%D9%84-%D8%A7%D8%AB%D8%A7%D8%AB-%D8%A8%D8%AC%D8%AF%D9%87.html
شركة المتحدة
شركة نقل عفش بالخبر
شركة نقل عفش بالمدينة المنورة
شركة نقل عفش بالرياض
شركة نقل عفش بجدة
شركة نقل عفش بمكة
شركة نقل عفش بالطائف
شركة نقل عفش بينبع
شركة نقل عفش بنجران
شركة نقل عفش بخميس مشيط
شركة نقل عفش بجازان
شركة نقل عفش بابها
شركة نقل عفش ببريدة
شركة نقل عفش بالقصيم
شركة نقل عفش بتبوك
شركة مكافحة حشرات بالقصيم وكذلك شركة كشف تسربات المياه بالقصيم وتنظيف خزانات وتنظيف الموكيت والسجاد والكنب والشقق والمنازل بالقصيم وتنظيف الخزانات بالقصيم وتنظيف المساجد بالقصيم شركة تنظيف بالقصيم تنظيف المسابح بالقصيم
شركة مكافحة حشرات بالقصيم
شركة كشف تسربات بالقصيم
شركة تنظيف شقق بالقصيم
شركة تنظيف خزانات بالقصيم
شركة تنظيف فلل بالقصيم
شركة تنظيف منازل بالقصيم
شركة تنظيف كنب بالقصيم
شركة تنظيف سجاد بالقصيم
شركة تنظيف مجالس بالقصيم
شركة عزل اسطح بالقصيم
شركة تسليك مجاري بالقصيم
شركة تنظيف مساجد بالقصيم
شركة تنظيف وصيانة مسابح بالقصيم
شركة تنظيف الاثاث بالقصيم
شركة تنظيف موكيت بالقصيم
شركة تنظيف ستائر بالقصيم
شركة جلي بلاط بالقصيم
شركة تنظيف منازل بجدة
شركة تنظيف بالبخار بابها
شركات مكافحة النمل الابيض بابها
معلم تركيب سيراميك بينبع
شركة تنظيف بجدة
شركات تنظيف بالبخار بجدة
شركة نظافة بالحمدانية
شركة تخريم خرسانة برابغ
شركة تنظيف خزانات بالرياض
شركة تنظيف منازل بالرياض
نقل عفش بيش
شركة تركيب طارد الحمام بالدمام
دباب نقل عفش بجدة
ونيت نقل عفش بجدة
شركات نقل عفش حديثة بالطائف
نقل عفش بالطائف
شركة نقل عفش بالخبر
تطبيق نقل عفش
شركة تنظيف خزانات بمكة
شركة عزل خزانات بمكة
شركة تنظيف بمكة
شركة تنظيف شقق بمكة
شركة تنظيف بابها
شركة تنظيف كنب بابها
شركة نقل عفش بالاحساء
https://companymovers9.wordpress.com/
https://newmoverdotblog.wordpress.com/
https://qwasdew.wordpress.com/
https://gigisaad.wordpress.com/
https://zlidein.com/read-blog/97062
https://zlidein.com/read-blog/97063
https://zlidein.com/read-blog/97071
https://zlidein.com/read-blog/99326
https://www.skreebee.com/read-blog/110085
https://telegra.ph/%D8%B4%D8%B1%D9%83%D8%A9-%D9%86%D9%82%D9%84-%D8%B9%D9%81%D8%B4-%D9%85%D9%86-%D8%AC%D8%AF%D8%A9-%D8%A7%D9%84%D9%89-%D8%AC%D8%A7%D8%B2%D8%A7%D9%86-07-12
https://webyourself.eu/blogs/25649/%D8%B4%D8%B1%D9%83%D8%A9-%D9%86%D9%82%D9%84-%D8%B9%D9%81%D8%B4-%D9%85%D9%86-%D8%AC%D8%AF%D8%A9-%D8%A7%D9%84%D9%89-%D8%AC%D8%A7%D8%B2%D8%A7%D9%86
https://www.merexpression.com/read-blog/21528
https://www.rolonet.com/blogs/89146/%D8%B4%D8%B1%D9%83%D8%A9-%D9%86%D9%82%D9%84-%D8%B9%D9%81%D8%B4-%D9%85%D9%86-%D8%AC%D8%AF%D8%A9-%D8%A7%D9%84%D9%89-%D8%AC%D8%A7%D8%B2%D8%A7%D9%86
https://oktob.io/posts/41814
https://webyourself.eu/blogs/26016/%D8%A7%D9%81%D8%B6%D9%84-%D8%B4%D8%B1%D9%83%D8%A9-%D9%86%D9%82%D9%84-%D8%B9%D9%81%D8%B4-%D8%AC%D8%AF%D8%A9-%D8%A7%D8%A8%D8%AD%D8%B1-%D8%A7%D9%84%D8%B4%D9%85%D8%A7%D9%84%D9%8A%D8%A9
https://oktob.io/posts/41908
https://www.domyate.com/2022/06/14/why-emc-mee-company-to-transfer-furniture-to-to-jeddah/
https://www.domyate.com/2022/06/12/best-nakl-afsh-jeddah/
https://www.domyate.com/2022/06/12/%d9%83%d9%8a%d9%81%d9%8a%d8%a9-%d9%81%d9%83-%d9%88%d8%aa%d8%b1%d9%83%d9%8a%d8%a8-%d8%a7%d9%84%d8%b9%d9%81%d8%b4-%d9%88%d8%a7%d9%84%d8%a7%d8%ab%d8%a7%d8%ab-%d8%a8%d8%ac%d8%af%d8%a9/
https://zlidein.com/read-blog/99328
https://telegra.ph/%D8%A7%D9%81%D8%B6%D9%84-%D8%B4%D8%B1%D9%83%D8%A9-%D8%AA%D9%86%D8%B8%D9%8A%D9%81-%D9%85%D9%83%D9%8A%D9%81%D8%A7%D8%AA-%D8%A8%D9%85%D9%83%D8%A9-07-17
http://html.net.linux17.wannafindserver.dk/forums/viewtopic.php?f=6&t=447291&sid=d49bfa79507d1da5e63e18cadb51c609
https://www.carookee.de/forum/Retinoblastom-Forum/32167082?mp=49083704862d5f02883b054f8275606a980b0ddf6bde4bc1a0c4b5&mps=%26%231588%3B%26%231585%3B%26%231603%3B%26%231577%3B+%26%231606%3B%26%231602%3B%26%231604%3B+%26%231593%3B%26%231601%3B%26%231588%3B+%26%231575%3B%26%231604%3B%26%231589%3B%26%231602%3B%26%231585%3B+%26%231575%3B%26%231604%3B%26%231583%3B%26%231608%3B%26%231604%3B%26%231610%3B#32167082
http://html.net.linux17.wannafindserver.dk/forums/viewtopic.php?f=5&t=447319&sid=02b7bb5d454a63d0454daad5ff0e8fa3
https://www.carookee.de/forum/Retinoblastom-Forum/32167083?mp=156822404062d6023635638289af31b90d4f5bbea03aea79dc802ca&mps=%26%231588%3B%26%231585%3B%26%231603%3B%26%231577%3B+%26%231578%3B%26%231606%3B%26%231592%3B%26%231610%3B%26%231601%3B+%26%231605%3B%26%231603%3B%26%231610%3B%26%231601%3B%26%231575%3B%26%231578%3B+%26%231576%3B%26%231605%3B%26%231603%3B%26%231577%3B#32167083
https://www.carookee.de/forum/Retinoblastom-Forum/32167084?mp=156822404062d604da7583a085d6df59451e00fbf675ffe4d767997&mps=%26%231588%3B%26%231585%3B%26%231603%3B%26%231577%3B+%26%231578%3B%26%231606%3B%26%231592%3B%26%231610%3B%26%231601%3B+%26%231582%3B%26%231586%3B%26%231575%3B%26%231606%3B%26%231575%3B%26%231578%3B+%26%231576%3B%26%231582%3B%26%231605%3B%26%231610%3B%26%231587%3B+%26%231605%3B%26%231588%3B%26%231610%3B%26%231591%3B#32167084
https://www.carookee.de/forum/Retinoblastom-Forum/32167085?mp=156822404062d60ab56d77ab711e09fefce9f81dfa2064fdad6969e&mps=%26%231588%3B%26%231585%3B%26%231603%3B%26%231577%3B+%26%231606%3B%26%231602%3B%26%231604%3B+%26%231593%3B%26%231601%3B%26%231588%3B+%26%231605%3B%26%231606%3B+%26%231580%3B%26%231583%3B%26%231577%3B+%26%231575%3B%26%231604%3B%26%231609%3B+%26%231580%3B%26%231575%3B%26%231586%3B%26%231575%3B%26%231606%3B#32167085
https://elasakr-jeddah.jimdosite.com/
https://business.go.tz/web/rashid.ndimbo/~/86020/home/-/message_boards/message/24415721
https://business.go.tz/web/rashid.ndimbo/~/86020/home/-/message_boards/message/24415731
https://business.go.tz/web/rashid.ndimbo/~/86020/home/-/message_boards/message/24458120
https://business.go.tz/web/rashid.ndimbo/~/86020/home/-/message_boards/message/24456486
https://bestmoversfurniture.wordpress.com/2022/04/05/transfer-furniture-jeddah/
https://www.smore.com/ps2zt
https://www.smore.com/s9rz8q
https://www.smore.com/0kthj
https://www.muratshriners.com/profile/elsakrjeddah/profile
https://www.medmotion.org/profile/elsakrjeddah/profile
https://ello.co/atar-almadinah
https://ello.co/atar-almadinah/post/9biwwplb4odbgeboq8xcgw
https://nowewyrazy.uw.edu.pl/profil/atar-almadinah
http://findfriendz.com/profile/173148.html
https://companyhouseservice.wordpress.com/2022/08/06/%d8%a7%d9%81%d8%b6%d9%84-%d8%b4%d8%b1%d9%83%d8%a9-%d8%aa%d9%86%d8%b8%d9%8a%d9%81-%d8%a8%d8%a7%d9%84%d8%b1%d9%8a%d8%a7%d8%b6/
https://www.edocr.com/v/d9xod4ar/atar-almadinah/shrka-nkl-aafsh-bgda
https://www.edocr.com/user/atar-almadinah
https://www.tuugo.us/Companies/atar-almadinah/0310006888242
https://www.tuugo.us/SiteViewer/0310006888242
https://topsitenet.com/startpage/ataralmadinah/859508/
https://topsitenet.com/profile/ataralmadinah/859508/
https://en.gravatar.com/elsakrjeddah
https://610b31f1e425e.site123.me/about
https://www.kickstarter.com/profile/atar-almadinah/about
https://500px.com/p/ataralmadinah?view=photos
https://about.me/atar-almadinah/
https://www.behance.net/ataralmadinah/
https://angel.co/u/atar-almadinah
https://vimeo.com/user163509125
https://ello.co/ataralmadinah/post/asrc-rqxhmfvgrr7skhajg
https://ello.co/ataralmadinah
https://www.myminifactory.com/stories/best-transfer-furniture-jeddah-atar-almadinah-62f1c48d224b9
https://www.myminifactory.com/users/atar
https://speakerdeck.com/almadinah
https://fstoppers.com/profile/atar-almadinah
https://www.instructables.com/member/atar-almadinah/
https://www.mifare.net/support/forum/users/atar-almadinah/
https://www.recode.net/users/ataralmadinah
http://simp.ly/p/bwJRTQ
https://zenwriting.net/jzlzjv7sf2
https://writer.zohopublic.com/writer/published/rg9748fafd0f2210f4604b33d2cbf28388aea
https://my.desktopnexus.com/ataralmadinah/journal/furniture-moving-company-in-jeddah-38820/
https://app.ex.co/stories/item/c9e4da01-b4c3-492f-84a4-55474a6abf47
https://pastelink.net/a93tslol
https://pastelink.net/6zkez7a2
https://www.kongregate.com/accounts/ataralmadinah
https://bit.ly/3PiheFn
https://bit.ly/3SJJZxX
https://giphy.com/channel/atar-almadinah
https://fullservicelavoro.com/2022/08/15/furniture-moving-companies-in-jeddah/
https://www.ted.com/profiles/37578103/about
https://www.merexpression.com/elsakr
https://www.merexpression.com/read-blog/31739
https://webyourself.eu/elsakrjeddah
https://webyourself.eu/blogs/31059/%D8%A7%D9%81%D8%B6%D9%84-%D8%B4%D8%B1%D9%83%D8%A9-%D9%86%D9%82%D9%84-%D8%A7%D8%AB%D8%A7%D8%AB-%D9%81%D9%8A-%D8%AC%D8%AF%D8%A9
https://devpost.com/elsakrjeddah
https://knowyourmeme.com/users/jumperads
https://ataralmadinah662300791.wordpress.com/2022/08/21/%d9%86%d9%82%d9%84-%d8%b9%d9%81%d8%b4-%d8%a8%d8%ac%d8%af%d8%a9-2/
https://atar-almadinah.over-blog.com/2022/08/sharikat-naql-eafsh-abhir-alshamalia.html
https://atar-almadinah.over-blog.com/2022/08/naql-eafsh-dakhil-jida.html
https://ataralmadinah662300791.wordpress.com/2022/08/22/%d8%b4%d8%b1%d9%83%d8%a9-%d9%86%d9%82%d9%84-%d8%b9%d9%81%d8%b4-%d8%a7%d8%a8%d8%ad%d8%b1-%d8%a7%d9%84%d8%b4%d9%85%d8%a7%d9%84%d9%8a%d8%a9/
https://jumperads.shutterfly.com/22
http://610b31f1e425e.site123.me/about
https://myworldgo.com/blog/40386/-
https://kaalama.org/read-blog/161044
https://kaalama.org/read-blog/161045
https://myworldgo.com/blog/40387/-
https://projects.umwhistory.org/cwh/myomeka/posters/show/38417
https://projects.umwhistory.org/cwh/myomeka/posters/show/38418
https://projects.umwhistory.org/cwh/myomeka/posters/show/38419
https://projects.umwhistory.org/cwh/myomeka/posters/show/38420
https://www.soft-clouds.com/blogs/1047/%D8%A7%D9%81%D8%B6%D9%84-%D8%B4%D8%B1%D9%83%D8%A9-%D9%86%D9%82%D9%84-%D8%B9%D9%81%D8%B4-%D8%A8%D8%AC%D8%AF%D8%A9
https://moodle.cce.cornell.edu/tag/index.php?tag=%D8%B4%D8%B1%D9%83%D8%A9%20%D9%86%D9%82%D9%84%20%D8%B9%D9%81%D8%B4%20%D8%A8%D8%AC%D8%AF%D8%A9
https://moodle.cce.cornell.edu/tag/index.php?id=3259
https://ataralmadinah.shutterfly.com/pictures#n_5
https://projects.umwhistory.org/cwh/myomeka/posters/show/38482
https://www.soft-clouds.com/blogs/1194/%D8%B4%D9%81%D8%B7-%D8%A8%D9%8A%D8%A7%D8%B1%D8%A9-%D8%A8%D8%AC%D8%AF%D8%A9
https://projects.umwhistory.org/cwh/myomeka/posters/show/38484
https://www.soft-clouds.com/blogs/1195/%D8%B4%D8%B1%D9%83%D8%A9-%D9%86%D9%82%D9%84-%D8%B9%D9%81%D8%B4-%D8%A7%D8%A8%D8%AD%D8%B1-%D8%A7%D9%84%D8%B4%D9%85%D8%A7%D9%84%D9%8A%D8%A9
https://kaalama.org/read-blog/162006
https://kaalama.org/read-blog/162008
https://ataralmadinah.shutterfly.com/pictures#n_5
https://uberant.com/users/ataralmadinah/
https://uberant.com/article/1860769-moving-furniture-in-jeddah/
https://www.ulule.com/elsakrjeddah/#/projects/followed
http://www.quan6.hochiminhcity.gov.vn/thutuchanhchinh/layouts/mobile/dispform.aspx?List=238a972d%2D3d44%2D45fd%2Dac5e%2D9e73bc02b75b&View=5de55f99%2D23ee%2D4fbd%2D9136%2D4fc3c67269b4&ID=4293
http://www.quan6.hochiminhcity.gov.vn/thutuchanhchinh/_layouts/mobile/dispform.aspx?List=238a972d%2D3d44%2D45fd%2Dac5e%2D9e73bc02b75b&View=5de55f99%2D23ee%2D4fbd%2D9136%2D4fc3c67269b4&ID=4295
http://www.quan6.hochiminhcity.gov.vn/thutuchanhchinh/layouts/mobile/dispform.aspx?List=238a972d%2D3d44%2D45fd%2Dac5e%2D9e73bc02b75b&View=5de55f99%2D23ee%2D4fbd%2D9136%2D4fc3c67269b4&ID=4294
https://onlylocal.com.au/listing/%d8%b4%d8%b1%d9%83%d8%a9-%d9%86%d9%82%d9%84-%d8%b9%d9%81%d8%b4-%d9%88%d8%a7%d8%ab%d8%a7%d8%ab-%d8%a8%d8%ac%d8%af%d8%a9/
https://emcmee.blogspot.com/2022/08/transfer-furniture-jeddah.html